Sunday, December 4, 2011

Hello again!

I'm alive! It's been quite a few months since my last post but I have a pretty good excuse - I moved to China. Yep, I now live in the grand metropolis of Shanghai and it has been a crazy few months. I started a new job at an international school, we settled ourselves into our new apartment and area, and made a whole group of new friends. There is never a dull moment in this city - the moment you step outside the apartment an adventure begins! It is exciting, but also very draining. There are so many people, the language and culture is so foreign and trying to accomplish simple things can be so time-consuming and stress-inducing. Just a visit to the supermarket requires the patience of a saint! Makes for plenty of stories, though.


My kitchen here is basic - a stove top, microwave and a tabletop oven (yup a little toaster oven thing). My cooking has become based on what is simple, quick and available. I've become good friends with my wok and am learning more about healthy Chinese cooking - 'when in Rome...' and all that! Phil is good enough to head down to the local wet market during the day to pick up unusual things like lotus root, fresh edamame and pomelo. He gets to practice his Chinese and I get interesting food, so everyone's happy :-) 

My Shanghai kitchen
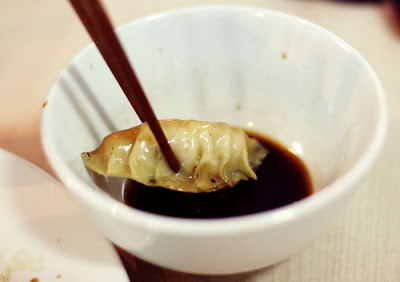
So here is one of the things we made in our first few weeks here - classic potsticker dumplings. Over here they're known as 'jiaozi'. The Chinese have so many types of dumplings - boiled, steamed, deep-fried, pan-fried - but these ones are first pan fried on the bottom (that's where the pot-sticking comes into it) and then you pour water into the pan to steam them for a few minutes. They are served up with a yummy soy-vinegar dipping sauce. This is simple Chinese comfort food at it's best.

These are not particularly quick to make, but it was fun. I could have popped out to the local supermarket and picked up a dozen for a dollar, but where's the fun in that? Besides, I got to skip the ever present MSG by making them at home. This would be a fun thing to make with children or a bunch of friends. Gather them together for a potsticker party!

If you would like to follow us on our China adventures, check out our blog www.underneonlanterns.com.


Wrapping up - a little tricky at first, but it gets easier!
Aren't they pretty? Little bundles of Chinese joy.
Steaming away
The dipping sauce is a soy/vinegar combo

I used store-bought wonton wrappers to make these, but if you're feeling extra conscientious you can make your own with flour and water. Below are the ingredients I used, but don't be restricted by them! The variety in the fillings of dumplings over here is incredible. 


Potsticker Dumplings

Approximately 20 round wonton wrappers
Vegetable oil for pan frying

Filling:

100g (about 1/4 pound) Chinese (Napa) cabbage
400g (1lb) lean ground pork (or substitute with chicken mince)

1 tsp salt
1/4 cup finely chopped green onions
1 tsp finely chopped ginger

1 tbsp Chinese cooking wine (Shaoxing)
1 tbsp soy sauce
1 tsp cornstarch

1 tsp sesame oil

Dash pepper


Dipping Sauce*:

3 tbsp soy sauce

1 tbsp rice vinegar
1/2 tsp chilli paste (optional)
  1. In a large bowl, mix all the filling ingredients. Get in there with your hands to mix it up well.
  2. Place 1 tablespoon meat filling in the center of a wonton wrapper. Lift up the edges of the circle and pinch 5 pleats up to create a pouch to encase the mixture. Pinch the top together. Repeat with the remaining wonton wrappers until you have used up all the filling.
  3. Heat a non-stick skillet until very hot. Add 1 1/2 tablespoons vegetable oil, tilting the pan to coat the sides. Place 12 dumplings in a single layer in the wok and fry 2 minutes, or until the bottoms are golden brown.
  4. Add 1/2 cup water to the pan. Cover and cook 6 to 7 minutes, or until the water is absorbed. Repeat with the remaining dumplings.
  5. To make the dipping sauce, combine the soy, vinegar and chilli in a small bowl. Serve with the dumplings.
* Ready made dumpling vinegar can be purchased at Chinese supermarkets.

Monday, August 1, 2011

Zucchini Season #6: Zucchini and Lemon Cookies

To finish our week of zucchini-loving, here is a recipe which I found most unusual when I first read it. Zucchinis in cookies?? Hmm, I don't know about that. After reading the reviews, however, I decided to give them a go. After all, I had been looking for unconventional ways to use zucchini.


I loved these cookies for both the taste and the texture. The pairing of zucchini with lemon zest brings a fresh and light flavour that most cookies lack, and they are airy and cake-like in their texture - so you can have a cookie and a slice of cake in one! Just the thing you need to go with a cup of steaming Earl Grey tea :-)

Zucchini and Lemon Cookies
Adapted from Food52

2 cups all-purpose flour
1 tsp baking powder
1 pinch coarse salt
3/4 cup unsalted butter, room temperature
3/4 cups sugar
1 egg, lightly beaten
2 tbsp fresh lemon zest
1 cup shredded zucchini
1 tspn vanilla
  1. Preheat oven to 190°C (375°F). Spray a cookie sheet with cooking spray.
  2. In a medium bowl combine flour, baking powder and salt. Set aside.
  3. In a large bowl, cream butter and sugar with electric beaters until light and fluffy.
  4. Add egg, lemon zest, zucchini and vanilla. Mix with a spoon until just incorporated (don't overmix or they will come out rubbery).
  5. Gently fold the flour mixture into the wet ingredients until all of the flour has been added and is completely mixed in. Again, be careful not to overmix.
  6. Drop rounded tablespoonfuls onto a prepared cookie sheet and bake for 14-16 minutes, or until edges of cookies are golden.
Makes about 24 cookies.

Sunday, July 31, 2011

Zucchini Season #5: Grilled Vege and Tofu Stack

In an effort to be healthier, Phil and I like to have a few meat-free meals each week. We do not believe however, that this means having to sacrifice flavour or satiety. This recipe is a classic example of what I'm talking about: marinaded and barbecued vegetables and tofu stacked and served with a generous dollop of basil pesto. It can be served as a side dish or the main event, and looks so wonderfully colourful that you won't know whether to dig in straight away or just admire it for a moment.


Maybe you haven't branched out into the world of tofu yet and  the word alone sends shivers down your spine, but I urge you to give it a try. Together with the lightly charred veges and the mouth-watering balsamic vinegar and garlic marinade, you will be very glad you did.

You can use a wide range of vegetables for this recipe, so don't be restricted by what is listed in the recipe. We used zucchini, red capsicum (bell pepper) and portobello mushrooms, but eggplant, sweet potato and tomato would also be wonderful. While you're at it, why not add a slice of grilled haloumi cheese (yum!). Phil and I adored the meatiness of the big portobellos and agreed it was worth paying the extra for them - after all, we didn't have to pay for any meat!

When I made this dish we were house-sitting for Phil's uncle who had a basil plant crying out to be loved into pesto. I do plan on posting a homemade pesto recipe at some stage, although on that particular day I was not taking much notice of my quantities. If you have a food processor and are feeling adventurous, just have a play around with about a cup of fresh basil leaves, 1/4 cup parmesan cheese, 1/3 cup walnuts (or pine nuts), juice of one lemon, a couple of chopped garlic cloves, a drizzle of olive oil and enough water to get a creamy consistency. I just keep adding a bit of this and that until it tastes just right. Fresh basil pesto really is soooo much better than store bought and went perfectly with this dish.

Grilled Vege and Tofu Stack
Adapted from Epicurious

1/3 cup balsamic vinegar
2 garlic cloves, minced
1/2 cup olive oil
1/4 cup thinly sliced fresh mint leaves
1 package (approx 12oz/340g) extra-firm tofu, cut crosswise into 8 slices, drained on paper towels
1 zucchini, trimmed, cut lengthwise into four 4-inch-long slices
1 red capsicum (bell pepper), rounded ends trimmed, seeded, cut lengthwise into 4 pieces
4 portobello mushrooms, stems removed
Basil pesto, to serve
  1. Fire up your grill, aiming for a medium-high heat.
  2. Place vinegar and minced garlic in large bowl. Gradually whisk in olive oil. Stir in sliced mint. Season marinade to taste with salt and pepper.
  3. Working in batches, add tofu to marinade and turn to coat. Transfer tofu to baking sheet and sprinkle with salt and pepper. Add zucchini, bell pepper, and mushrooms to marinade and toss to coat.
  4. Place vegetables on grill and sprinkle with salt and pepper. Cook until charred and softened, turning occasionally, about 6 minutes. Transfer to baking sheet.
  5. Place tofu on grill. Cook until tofu is charred, about 2 minutes per side.
  6. Stack tofu and vegetables on plates. Dollop a tablespoon of basil pesto on the top, drizzle with any left over marinade and garnish with mint or basil sprigs.
Makes 4 stacks.

Saturday, July 30, 2011

Zucchini Season #4: Curried Zucchini Soup

I'm excited to post today's zucchini recipe because it is a recipe you can enjoy whether it is chilly outside (all you folk Down Under) or sweltering (like here in the US). This seriously tasty soup can be served hot or chilled, depending on your taste and the seasons. However you serve it, make sure you garnish it with toasted almonds as it takes the soup from tasty to YUM! Until I found this recipe I never would have thought to sprinkle nuts on soup, but take my word for it - it works.


I love to make soup, especially in the winter. There are few things more comforting than wrapping your hands around a steaming bowl of hearty soup. If you aren't usually keen on vegetable soups, give this one a go - it is loaded with flavour and the potato makes it smooth and satisfying.

Curried Zucchini Soup
From Martha Stewart

1 tbsp olive oil
1 medium onion, chopped
Coarse salt
2 garlic cloves, minced
2 tsp curry powder
3 medium zucchinis (about 700g/1.5lb), sliced 1 inch thick
1 baking potato, peeled and cut into 1-inch chunks
1/3 cup sliced almonds, toasted, for garnish
  1. Heat oil in a large saucepan over medium heat. Add onion and 1 tablespoon salt; cook, stirring occasionally, until the onion is soft, 4 to 5 minutes.
  2. Add garlic and curry powder; cook, stirring constantly, until fragrant, about 1 minute.
  3. Add zucchini, potato, and 4 cups water. Bring to a boil; reduce heat, and simmer until vegetables are tender, 10 to 15 minutes.
  4. In batches, puree soup in a blender (do not fill more than halfway or you may have a zucchini-coated kitchen) until smooth.
  5. Serve immediately, or let cool, and refrigerate in an airtight container until chilled. Garnish with toasted almonds.

Friday, July 29, 2011

Zucchini Season #3: Zucchini Oven Chips

Here's a fun and easy way to eat zucchini - coated in a parmesan crust and baked! Serve with a marinara sauce (or ketchup!) and even the kids will gobble them up.


Zucchini Oven Chips
From Cooking Light

1/4 cup dry breadcrumbs
1/4 cup fresh Parmesan cheese, grated
1/4 tsp seasoned salt
1/4 tsp garlic powder
1/8 tsp freshly ground black pepper
2 tbsp milk
2 medium zucchinis, sliced into rounds
Cooking spray
  1. Combine first 5 ingredients in a medium bowl, stirring with a whisk.
  2. Place milk in a shallow bowl. Dip zucchini slices in milk, and dredge in breadcrumb mixture.
  3. Place coated slices on an ovenproof wire rack coated with cooking spray; place rack on a baking sheet.
  4. Bake at 220°C (425°F) for 30 minutes or until browned and crisp. Serve immediately with a marinara sauce.

Wednesday, July 27, 2011

Zucchini Season #2: Zucchini Fritters

For my next adventure with zucchini, I found this recipe for zucchini fritters. With fresh lemon and coriander (cilantro) it was bound to be a winner. Phil, still harboring a little doubt regarding my zucchini-can-be-tasty campaign, was a little unsure if he was going to enjoy it. To his surprise he loved them, especially the extra crispy ones. We gobbled it up for lunch topped with this bean salad


Zucchini Fritters
From seven spoons

450g (1lb) zucchini (about 2 medium)
Zest of one lemon
1 small shallot, minced (I used about 1/5 onion)
1 small red chilli, minced
2 tablespoons finely chopped flat-leaf parsley
2 tablespoons finely chopped cilantro
1 teaspoon salt
1/4 tablespoon freshly ground black pepper
1/2 cup all-purpose flour
2 eggs, lightly beaten
Vegetable oil, for frying
  1. Using a box grater, grate the zucchini. Place zucchini between a few layers of paper towel and squeeze out the excess moisture.
  2. In a bowl, combine all the remaining ingredients, except for the beaten egg. While stirring, add the egg slowly and thoroughly combine. Gently fold in the dried zucchini.
  3. Heat a few tablespoons of olive oil in a large frying pan over medium high heat. When the oil is hot, but not smoking, drop heaped tablespoons of the batter into the oil, flattening them slightly with the back of a spatula. Cook for about 2-3 minutes per side, or until golden brown and crisp. You can also tell when they are cooked by pressing slightly on the surface – the fritter should feel like a cooked pancake; firm but with a bit of spring.
  4. Repeat until all the batter is used. Keep warm in a low oven, or serve at room temperature garnished with lemons and a scattering of fresh parsley. Other tasty accompaniments are sweet chili sauce, sour cream or a fresh bean salad.
Makes about 12 fritters.

Tuesday, July 26, 2011

Zucchini Season #1: Zucchini Spice Bread

Until a few weeks ago, I had never heard of such a thing as zucchini bread. Maybe it's an American thing, but it sure was news to my Australian ears. I sampled a piece made by my friend, Caron, and was instantly keen to get on this zucchini-cake-baking train. After all, what did I have to lose with such enormous zucchinis crying out to be used up?


To a lot of people I'm sure it sounds like a recipe for those whose taste buds have gone on vacation, but give me a moment to persuade you. Think of this as more of a spice cake than a zucchini cake - think carrot cake, but better. The zucchini keeps the cake delightfully moist, and is the perfect backdrop to spices like cinnamon, nutmeg and clove. Yum.

Caron generously shared her mum's recipe with me, which I adapted a little. I exchanged some of the oil for apple sauce (such an easy way to cut the fat!), upped the spice and finished it off with a steusel topping. My version has more of a light cake consistency than the traditional zucchini bread, so it would lend itself well to being baked in a ring mold or regular cake tin. It's the perfect baked treat to take to work for morning tea. Tell me what you think!

Zucchini Spice Bread
Adapted from a recipe shared by Caron Peavy

3 eggs
1 cup vegetable oil (or 1/2 cup oil and 1/2 cup unsweetened apple sauce)
1/2 cup apple sauce
2 cups white sugar
2 cups grated zucchini
2 tsp vanilla extract
3 cups all-purpose flour
3 tsp ground cinnamon
1/2 tsp nutmeg
1/4 tsp cloves
3 tsp baking powder
1 tsp salt
1/2 cup chopped walnuts

For the streusel topping:
1/2 cup chopped walnuts
1/2 cup plain flour
1/2 cup brown sugar
2 tbsp butter
2 tsp cinnamon
  1. Preheat oven to 165°C (325°F). Grease and flour two 8x4 inch loaf pans.
  2. In a large bowl, beat eggs until light and frothy. Mix in oil and sugar (and apple sauce, if using). Stir in zucchini and vanilla. Combine flour, spices, baking powder, salt and nuts; stir into the egg mixture. Divide batter into prepared pans.
  3. To make the streusel topping, mix all the ingredients together really well with your (clean) fingers until it becomes crumbly and sprinkle over the batter.
  4. Bake for 60 to 70 minutes, or until done.
Makes 2 loaves.

Monday, July 25, 2011

Zucchini Season!

It is zucchini (courgette) season here in the US and my friend, Cathy, gave me the biggest zucchinis I have ever seen. I was thrilled to receive some home grown veges and absolutely amazed at the size of them. They were three times the size of a normal zucchini and 14 inches long!


So for the last couple of weeks I've been looking for interesting zucchini recipes in an attempt to use up this mountain of vegetable. Typically I use zucchini grated into omelettes, sliced in stir fries or chunks in Thai curries, but this adventure opened up a whole world of possibilities for the humble gourd. Low in calories and rich in vitamins and minerals, I discovered that zucchinis, while being terribly undervalued in the kitchen, have so much potential. Did you know that you can even use zucchini to make cookies? Who knew?! For the next week or so, I will be posting different ways to use zucchini - sweet and savoury, baked, fried and grilled. What are some ways that you like to use zucchini?

Wednesday, July 20, 2011

Rosemary Bread

“There is no smell in the world of food to equal the perfume of baking bread and few greater pleasures in eating than sitting down with a slice of freshly baked bread, good butter, and a cup of tea or coffee.” — James Beard, Beard on Bread

While we're on a rosemary kick, you NEED to know about this recipe. If you have a breadmaker then I strongly encourage you to give this one a go. If you don't own one, now you have a pretty good reason to invest. Alternatively, you probably have a friend or relative with a breadmaker collecting dust in a lofty cupboard. Do them a favour and borrow their appliance with the promise of bringing them fresh herb bread! Being somewhat of a gypsy at the moment I don't have a breadmaker myself (it's a tricky thing to fit into a suitcase) but I am fortunate that my mother-in-law, with whom I am living, does. My eyes really have been opened to the wonder of this kitchen appliance. They are so easy to use, make the house smell divine while they are cooking, and produce gorgeous breads and doughs. I'm itching to see how it goes with making pizza dough.


My mother-in-law, Molly, found this recipe at allrecipes.com where it received 5 stars from over 900 reviews! That many people can't be wrong. If you don't have a breadmaker, read some of their reviews (link is below) as a few people give tips for making the bread in an oven.  If you are lucky enough to have fresh rosemary on hand, you can substitute a couple of teaspoons for the dried version.

The bread is fluffy and light and so full of flavour. It is amazing when made into simple open-faced melts (my husband's current favourite lunch), simply dipped in olive oil and balsamic vinegar, or smeared with buttery garlic and made into crusty garlic bread. Oh my, how my stomach aches for some right now...

Rosemary Bread
From allrecipes.com

1 cup water
3 tablespoons olive oil
1 1/2 teaspoons white sugar
1 1/2 teaspoons salt
1/4 teaspoon Italian seasoning
1/4 teaspoon freshly ground black pepper
1 tablespoon dried rosemary
2 1/2 cups bread flour
1 1/2 teaspoons active dry yeast
  1. Place ingredients in the pan of the bread machine in the order recommended by the manufacturer. Select white bread cycle; press Start.
To make the open-faced melts pictured above, cut the bread into thick slices and toast on both sides. Spread the toast with basil pesto and top with sliced tomato, freshly cracked pepper and sea salt, and a slice of Swiss  cheese. Toast until the cheese melts. Top with baby rocket (arugula) and enjoy!

Wednesday, July 13, 2011

Flavour of the Moment: Rosemary

Who would have thought to put rosemary in a potato salad? I love trying something new that is totally out of the box but tastes amazing. My mother-in-law prepared this delightful potato salad to go along with the ribs we made for 4th of July. The recipe combines the tang of lemon and the vibrant flavours of fresh rosemary with the classic creaminess of a potato salad. Give this a go for your next picnic or outdoor barbeque!


Potato Salad with Pancetta, Lemon and Rosemary
Via Bon Appetit

5 slices pancetta (Italian bacon)
1/4 cup fresh lemon juice
1 tbsp minced fresh rosemary
2 tsp finely grated lemon peel
1 garlic clove, pressed
2/3 cup mayonnaise (we used an olive oil based one)
1.3kg (3lbs) Yukon Gold potatoes
3 large celery stalks, thinly sliced
2 tbsp chopped fresh parsley
  1. Preheat oven to 200°C (400°F). Arrange pancetta slices on a baking sheet, spacing apart. Bake until golden brown and crisp, about 20 minutes (do not turn). Drain on paper towels. Allow to cool before coarsely chopping pancetta.
  2. While the pancetta is baking, whisk lemon juice, rosemary, lemon peel, and garlic in small bowl. Gradually whisk in mayonnaise. Season dressing to taste with salt and pepper.
  3. Place potatoes in a large pot. Add enough cold water to cover by 1 inch. Bring to boil then reduce heat to medium. Simmer with the lid ajar until potatoes are tender, 18 to 25 minutes, depending on size of potatoes. Drain and let stand until cool enough to handle.
  4. Remove the skin from the potatoes, if desired, and then cut into 1/4-inch-thick slices.
  5. Place the potato in a large bowl and add the chopped celery. Drizzle dressing over and toss gently to coat. Season with salt and pepper. Cover and chill until cold, at least 2 hours.
  6. Before serving, sprinkle the potato salad with pancetta and chopped parsley.
Serves 8

This can be made a day ahead up to Step 5 and refrigerated until needed. Store the pancetta in the fridge, but bring it to room temperature before sprinkling over the salad.

VARIATION: If you prefer a non-creamy potato salad, replace the mayonnaise with olive oil.

Friday, July 8, 2011

Sab's Magic Ribs

When it comes to serving up amazing food and wine, it's hard to find a better team than our Aussie friends, Shayne and Sabine. Shayne knows more about wine that anybody I know and Sab has a knack for flavours and creativity in the kitchen. So it was no surprise when she cooked up these unbelievably tasty ribs for me and Phil last summer. Being the generous soul that she is, Sab was good enough to share her recipe.


Although they take a little forethought, these ribs are a snap to make because they just have to be marinated and then baked in the oven. No grilling required and no lengthy hours in the oven. And what takes them from average to sensational is the sauce. Far from your predictable barbecue flavours, it is a sweet Asian spiced sauce with a surprising blend of ingredients that taste amazing when combined. Elizabeth, my sister-in-law, says she could eat the sauce straight - enough said!

As I had never cooked ribs before, a little research was required to make sure I was on the right track. Check out this site for all you need to know about rib cooking. We decided to use baby back ribs, but side (spare) ribs would work just as well if given a longer cooking time. Either way it is important to remove the membrane that is on the underside of the ribs. With my mother-in-law's help we managed to peel it off pretty easily to allow the marinade to permeate through the meat. Here's a video how-to:


We served the ribs with potato salad and a tasty Asian salad, which is a regular favourite at many Aussie barbeques.

Sab's Magic Ribs
By Sabine Giles

2.5kg (5lbs) pork ribs

For the marinade:
2 cups apple juice
4 tbsp maple syrup
2 tbsp vegetable oil
4 tbsp soy sauce
2 tbsp brown sugar
3 tspn mustard powder
1/2 cup tomato sauce (ketchup)
a couple of broken up cinnamon quills
2 or 3 star anise
4 or 5 roughly chopped garlic cloves
  1. Preheat oven to 180°C (355°F). Line a large baking tray with foil.
  2. Mix together the ingredients for the marinade. Soak the ribs in the marinade overnight.
  3. Remove ribs from marinade and place in a large baking tray. Bake for about 1.5 hours or up to 2 hours if you are using side ribs.
  4. While the ribs are roasting, boil the excess marinade in a medium saucepan until it is reduced by about 1/2 to make sauce for dipping.
  5. When the ribs have been in the oven for about an hour, remove from the oven and baste both sides with some of the reduced marinade. Return to the oven.
  6. When ready, remove from oven and cut the ribs between the bones. Serve with dipping sauce and a tasty coleslaw.
N.B. In America we had some trouble finding star anise at our local grocery store. If you can't get to an Asian grocer, do what we did and substitute 1/2 tspn Chinese Five Spice powder for the star anise and the cinnamon quills.

Monday, July 4, 2011

Happy Fourth of July!

Yay for family, fireworks and living in a free country! This afternoon, my sister-in-law and I cooked up some fun Independence Day cupcakes. We used a basic vanilla batter and iced them with vanilla buttercream frosting. The batter had lemon zest in it which was absolutely perfect with the vanilla. Everyone agreed that they tasted as good as they looked!


Vanilla Cupcakes with Vanilla Buttercream Frosting
via Joy of Baking

1/2 cup unsalted butter, room temperature
2/3 cup granulated white sugar
3 large eggs
1 teaspoon pure vanilla extract
Zest of 1 large lemon
1 1/2 cups plain flour
1 1/2 teaspoons baking powder
1/4 teaspoon salt
1/4 cup (60 ml) milk

Buttercream Frosting:
2 cups confectioners sugar (icing or powdered sugar), sifted
1/2 cup unsalted butter, room temperature
1 teaspoon pure vanilla extract
2 tablespoons milk
  1. Preheat oven to 180°C (350°F) and line 12 muffin cups with paper liners.
  2. Cream the butter and sugar with an electric mixer until light and fluffy. Add the eggs, one at a time, beating well after each addition. Beat in the vanilla extract and lemon zest.
  3. In a separate bowl whisk together the flour, baking powder, and salt.
  4. With the mixer on low speed, alternately add the flour mixture and milk, in three additions, beginning and ending with the flour. Scrape down the sides of the bowl as needed.
  5. Evenly fill the muffin cups with the batter and bake for about 17 - 20 minutes or just until set and a toothpick inserted into a cupcake comes out clean. (Do not over bake or the cupcakes will be dry.) Remove from oven and place on a wire rack to cool.
  6. To make the buttercream frosting, cream the butter with an electric mixer until smooth and well blended. Add the vanilla extract. With the mixer on low speed, gradually beat in the sugar. Scrape down the sides of the bowl. Add the milk and beat on high speed until frosting is light and fluffy (about 4 minutes). Add a little more milk or sugar, if needed. At this stage you can tint the frosting if you want with food colouring.
  7. Once the cupcakes have completely cooled, frost with icing using a piping bag. I used a ziplock bag with one corner snipped off. Decorate with stars, sprinkles, coloured sugar, etc.
Makes 12 cupcakes.

These cupcakes are best eaten the same day they are made, but they can be covered and stored for a few days if necessary.

Thursday, June 30, 2011

Tzatziki

I recently had dinner at a lovely Greek restaurant in Tennessee with my fabulous American family. We had quite a spread... avgolemono soup, gyros, moussaka and delightfully refreshing tzatziki. It inspired me to make  my own version of the refreshing cucumber dip. Tzatziki - tricky to say but so easy to eat!


Tzatziki

1 cup thick Greek yogurt*
1/2 cup English/Continental cucumber (the long skinny type that usually comes wrapped), grated
1 clove garlic, minced
2 tspn lemon juice
sea salt and cracked pepper
  1. Strain the liquid out of the grated cucumber by placing it between a few layers of paper towel and squeezing. It is important to do this step otherwise the tzatziki will be watery.
  2. In a small bowl, mix together the yogurt, cucumber, garlic and lemon juice.
  3. Season with salt and pepper. Add more salt/pepper/lemon juice/garlic to make it perfect for your tastebuds.
  4. Serve with warm pita bread and crudites.
* To make your own thick Greek yogurt (and save a few bucks), check out my previous post for some tips.

Monday, June 20, 2011

Date and Banana Muffins

This recipe for the truly health conscious. It is made with whole wheat, sweetened with dates and bananas (that's right - no sugar at all!) and contains no oil or butter. You'd think these muffins would be bland and dry, wouldn't you? The good news is, however, that they come out surprisingly fluffy and moist, and full of flavour thanks to the spices.


When I started using this recipe about four years ago, I made it as a cake in a silicon ring mold (bundt pan). I decided to start making the recipe into muffins instead so that I could freeze them easily. They are perfect to pull out of the freezer in the morning and will be defrosted and ready to eat by mid-morning. I like to zap them for 20 seconds in the microwave because they are even better warm. The cake version would be lovely drizzled with a light lemon or vanilla icing and served with tea for health conscious friends.

Date and Banana Muffins

3 bananas
1 cup dates, chopped
½ cup yoghurt
4 egg whites
1 tspn vanilla essence
1 ½ cups wholemeal SR flour
1 tspn bicarbonate of soda
1 tspn mixed spices (or your own combination of ground cinnamon, nutmeg and cloves)
  1. Preheat oven to 180°C (360°F). Grease muffin pans or line with paper liners. Alternatively, to make a cake, grease a ring mold or loaf tin.
  2. Mash bananas.
  3. Blend dates and yoghurt in a blender.
  4. Beat in one egg at a time.
  5. Add bananas and essence.
  6. Sift though flour, bicarb and spices. Fold through gently.
  7. Bake for 20 mins for muffins or 35-40 mins for a cake.
Be sure to eat these all up within a couple of days as they tend to dry out quickly. Alternatively, wrap them in Glad wrap and throw them in the freezer.

Monday, June 13, 2011

Strawberry Yogurt Parfait

I love yogurt. No really - I LOVE yogurt. I could probably live on the stuff. I love it so much that I used to go to the effort of making my own when I lived in China where it was hard to get my hands on an inexpensive natural yogurt. Occasionally I would strain my yogurt to make it thick and creamy in the Greek style.  And it only occurred to me recently that rather than paying the high prices for Greek yogurt here in the US, I could just strain store bought natural yogurt. I'm not sure why it took me so long to figure that out, but better late than never. 


So if you are also a Greek yogurt lover and fancy saving a few bucks, grab yourself a coffee filter or a piece of muslin (cheese) cloth to line a sieve. Let the sieve rest over a bowl (make sure the bottom of the sieve doesn't touch the bowl). Scoop as much regular yogurt, such as Dannon natural yogurt, as will fit in the coffee filter. All you have to do now is pop it in the fridge for a couple of hours. The longer you leave it, the thicker the yogurt will become. In a short while you will see a yellowy liquid gathering in the bowl - that's the whey. Apparently it's best not to remove too much of this whey because it contains loads of protein and amino acids, as well as much of the good bacteria that makes yogurt so healthy (read more). The whey also gives yogurt it's delightfully tangy flavour. A couple of hours in the fridge removes enough that the yogurt is nice and thick and ready to be used for all sorts of things. Just the other day I saw TV chef, Chuck Hughes, use yogurt that had been strained overnight (suuuper thick!) for frosting on a carrot cake. Genius! At the moment we can't get enough of Greek yogurt parfaits piled with granola...

Strawberry Yogurt Parfait

2 cups strained (or Greek) plain yogurt
1 1/2 tbsp honey
1/2 tsp vanilla extract
1 cup strawberries, chopped
1 tbsp strawberry jam
6 tablespoons granola or muesli

1. In a small bowl, mix together the yogurt, honey and vanilla until evenly combined.
2. In another small bowl, stir the jam through the strawberries so that they are well coated. If you have a sweet tooth you may like to add more jam at this stage.
3. In small glasses, layer the yogurt and strawberry mix. I like to put some yogurt in first, followed by the strawberries and then another layer of yogurt. 
4. Right before you dig into your parfait, sprinkle the top with the granola. Enjoy!

Makes 2-3 parfaits


The combinations for these parfaits are endless. What is your favourite way to use yogurt?

Wednesday, June 8, 2011

Sesame Chicken without the Guilt

I tried this recipe out in the hope of finding something that would satisfy a Chinese food craving without loading up on calories. The chicken is pan-fried rather than deep-fried, but just as tasty. We both loved it and I know it will become a regular on our dinner table.


The original recipe from Martha Stewart calls for broccoli, but I had green beans in my fridge to be used up. They worked really well. I think snow peas or capsicum (bell pepper) would also be really tasty. See what you think!

Sesame Chicken
Adapted from Martha Stewart's recipe

3/4 cup rice
3 tablespoons honey
2 tablespoons sesame seeds
2 tablespoons soy sauce
1 garlic clove, crushed
2 large egg whites
1/4 cup cornstarch
600g (1 1/2 lbs) skinless chicken breasts, cut into 2-inch chunks
Coarse salt and ground pepper
3 tablespoons vegetable oil, such as canola or safflower
4 scallions, thinly sliced
Couple of handfuls of green beans, ends removed
  1. Cook rice according to package instructions.
  2. Meanwhile, make sauce: In a small bowl, combine honey, sesame seeds, soy sauce, and garlic. Set aside.
  3. Heat a tablespoon of the oil in a non-stick skillet over medium-high heat. Saute the green beans until they start to turn a little brown, about 8 minutes. Set aside.
  4. In a large bowl, whisk together egg whites and cornstarch. Add chicken; season with salt and pepper, and toss to coat.
  5. In a large non-stick skillet, heat 1 tablespoon oil over medium-high. Add half the chicken; cook, turning occasionally, until golden and opaque throughout, 6 to 8 minutes. Transfer to a plate; repeat with remaining tablespoon oil and chicken.
  6. Return all the chicken and beans to skillet; add reserved sauce and scallions, and toss to coat.
  7. Serve on a bed of rice.
Warning: It really is important to use a non-stick pan for this recipe. The first time I tried it I used a regular frying pan and the chicken ended up sticking to it and the kitchen was very smoky! Works beautifully with the non-stick though. 

Tuesday, May 31, 2011

Tiramisu

Joe's Italian birthday dinner was finished off with this fluffy, creamy tiramisu. In Italian, tiramisu literally means "pick me up" which I think is a very fitting title because it's one of those desserts that just makes life seem a little bit better :-)


This recipe goes way back to when my sister, Bel, was in high school and she wanted to cook something Italian for a Home Economics project. She stumbled upon this gem (no idea where!) and it has become well-loved by my family ever since. It's not a typical tiramisu - it has no fancy liqueur or marscapone. Instead it has a rich lemon cream cheese filling which marries surprisingly well with the coffee and cocoa flavours.

Tiramisu

25 sponge fingers (aka lady fingers or savioardi biscuits)
8 tbsn cold black sweet coffee
4 egg yolks
½ cup castor sugar
3 drops vanilla essence
½ grated lemon rind
350g cream cheese
2 tspn lemon juice
250ml single cream
2 tbsp cocoa powder
1 tbsp icing sugar
  1. Arrange ½ sponge fingers in an even layer on the bottom of a dish and spoon ½ coffee over.
  2. Put egg yolks, sugar, vanilla and lemon rind in a heat proof bowl. Stand the bowl over a saucepan of gently simmering water (or use a double boiler) and whisk until very thick and creamy. This is a good arm workout as it takes about 10-12 minutes.
  3. Beat cream cheese and lemon juice in bowl until smooth.
  4. Combine egg and cream cheese mix and stir until evenly combined.
  5. Spread ½ mix evenly over sponge fingers.
  6. Add another layer of sponge fingers and sprinkle with remaining coffee.
  7. Cover with remaining cream cheese mix and chill in the fridge for an hour.
  8. Whip the cream until stiff and spread over dessert.
  9. Sift an even layer of cocoa and a light layer of icing sugar over the top. Stand back and admire your work!
Serves 6

Monday, May 30, 2011

An Italian Birthday

It's birthday time in the Cancelleri household (yay!), and what better way to celebrate than with some tasty Italian food. The birthday man, Joe, requested a cheesy, bacony, garlicky gnocchi bake which went down a treat. It was simple to make and very tasty - you can't go wrong with this combination of flavours!


If you've got a busy week coming up, this can be made ahead of time up to Step 8 and frozen. Add the mozzarella after thawing and bake for easy weeknight deliciousness.


Gnocchi Bake
Adapted from Good Taste

1 tbs olive oil
1 large brown onion, chopped
2 garlic cloves, minced
4 short-cut bacon rashers, coarsely chopped
200g button or baby bella mushrooms, thinly sliced
1/2 cup white wine
400g can diced tomatoes, partly drained of juice
1 tsp dried Italian herbs
salt and freshly cracked pepper
120g baby spinach leaves
500g pkt shelf-fresh gnocchi
2 tbsp grated parmesan cheese (optional)
200g fresh mozzarella or bocconcini, drained, torn in half
  1. Heat oil in a large frypan over medium heat. Cook the onion and garlic, stirring, for 1 minute.
  2. Add bacon and cook, stirring, for 3-4 minutes or until bacon is lightly golden.
  3. Add mushroom and cook for 3-4 minutes or until mushroom is soft.
  4. Add the wine. Cook, scraping any bits from the base of the pan, for 3-4 minutes or until wine reduces by half.
  5. Stir in the tomato and herbs. Season with salt and pepper.
  6. Preheat oven to 180°C (360°F). Cook the gnocchi in a large saucepan of salted boiling water following packet directions.
  7. While the gnocchi is cooking, stir the spinach into the tomato mixture until it just wilts.
  8. When the gnocchi is ready, drain and then add to tomato mixture. Stir to combine.
  9. Pour into one medium-sized casserole dish. Sprinkle with parmesan cheese and top with the mozzarella. Bake for 20-25 minutes or until the cheese melts and becomes golden brown.

Friday, May 13, 2011

When my nieces came to play...

In the battle of the bulge, I generally aim to avoid baking sweet and buttery items. I like sweet things just a little too much and have no self control when it comes to a fresh batch of cookies. But what better excuse to indulge than when my gorgeous nieces, Meg and Elisha, came to my house for a sleep-over? After all, cooking together is a bonding experience, so really it was my duty as an aunt to lead such an endeavor. After all, no girly sleep-over is complete without some sweet treats and I was dying to try out my new alphabet cookie cutters.


We used a basic sugar cookie recipe, which we decorated with coloured sugar. There seems to be some debate over whether the coloured sugar should be added before or after baking. Add it before and it sticks nicely to the dough shapes, but the colours are paler after being baked. Sprinkle the sugar on after, and you need something like corn syrup or egg white to help the sugar stick. We decided to go for the latter and were quite happy with the results.

Sugar Cookies

1 cup self raising flour
1 cup plain flour
Pinch salt
125g butter
1/2 cup sugar
1 egg
1/2 tpsn of vanilla essence
milk (if too dry)

For the coloured sugar:
1 cup castor sugar
1/4 cup corn syrup (or use 1-2 egg whites)
food colouring
  1. Preheat oven to 180ºC.
  2. Mix butter and sugar till light and fluffy.
  3. Add egg, flour and salt, mix well. If mixture is too dry then add some milk.
  4. Knead lightly and roll out on a floured board to about 5mm.
  5. Cut out in desired shapes and place on a greased cookie tray.
  6. Bake for 15 mins, or until lightly browned. Allow to cool completely before decorating.
  7. While the cookies are baking and cooling, make the coloured sugar: place 1/4 cup castor sugar into four seperate, small ziplock bags (or small bowls). If you are only using one colour, you will only need one bag/bowl.
  8. Add a few drops of food colouring, seal the bag and shake until the colour is evenly distributed through the sugar. Add more colouring until you reach the desired depth of colour. Repeat for each colour. You can even try blending colours to make new colours (e.g. red and blue to make purple).
  9. When cool, mix the corn syrup (or egg white) with a teaspoon of water. Apply a very small amount to each cookie with a pastry brush. Sprinkly with coloured sugar. Shake of excess.

Thursday, May 5, 2011

Chipotle Beef Tacos with Cabbage and Radish Slaw

Happy Cinco de Mayo! This recipe is dedicated to my dear sister, Bel, who, after returning from a recent trip to the US, is lamenting the absence of good Mexican food in Australia. Unfortunately we don't have very authentic Hispanic food Down Under. Our version is piled with cheese and tomato, which is a far cry from the real stuff which is packed with spices, lime and fresh herbs. Such a shame. To fill the void give this recipe a go. The meat is slow-cooked for up to 8 hours, so after a long day at work you can arrive home to the most amazing aroma. My husband said it tasted very authentic and declared it a 'winner'.


Chipotle Beef Tacos with Cabbage and Radish Slaw
From Real Simple

3 pounds (1.3kg) beef chuck, trimmed and cut into 2-inch pieces
1 large onion, thinly sliced
4 cloves garlic, chopped
1 to 3 tablespoons chopped canned chipotles in adobo sauce*
1 teaspoon dried oregano
2 bay leaves
kosher salt
4 cups thinly sliced cabbage (about 1⁄3 medium cabbage)
4 radishes, halved and thinly sliced
1/4 cup chopped fresh cilantro (coriander)
2 tablespoons fresh lime juice, plus lime wedges for serving
12 6-inch corn tortillas
sour cream, pickled jalapeño peppers and hot sauce, for serving
  1. In a 4- to 6-quart (approx 4-6L) slow cooker, toss together the beef, onion, garlic, chipotles, oregano, bay leaves, and 1 teaspoon salt.
  2. Cover and cook until the beef is very tender, on low for 7 to 8 hours or on high for 3 ½ to 4 hours ( I went for long and slow.)
  3. Twenty minutes before serving, heat oven to 180°C (350°F). In a large bowl, toss together the cabbage, radishes, cilantro, lime juice, and ¼ teaspoon salt.
  4. Wrap the tortillas in foil and bake until warm, 5 to 10 minutes. If you're feeling lazy, it works just fine to zap them in the microwave for about 30 seconds.
  5. While the tortillas are heating, transfer the beef to a medium bowl (reserve the cooking liquid) and shred, using 2 forks. Strain the cooking liquid through a fine-mesh sieve into the bowl with the beef and toss to combine.
  6. Fill the tortillas with the beef and slaw. Serve with the sour cream, jalapeños, hot sauce, and lime wedges.
* I'm not sure if cans of chipotle in adobo sauce are widely available in Australia. If you find some, let me know where you made the discovery so I can spread the word. The adobo sauce is key so it really is worth searching for to make this recipe! The chipotles (which are smoked jalepeno chillis) give the dish a delicious smoky flavour. If you can't find it, I found a recipe here that you could use instead to make your own.

Wednesday, May 4, 2011

Flourless Chocolate Cake

Have you ever eaten something that was totally delicious, only to find out after you've finished that it was made from something you normally wouldn't find appealing? Reminds me of eating snake soup in China, but that's another story. Fortunately, this recipe is surprising in a completely wonderful way. Being a flourless chocolate cake, one would assume that it would largely consist of almond or hazelnut meal, but instead it's made from pureed chick peas! I know - it sounds terrible, but it's absolutely delicious and the added bonus is you can convince yourself that it's practically health food :-)


My mother-in-law found this winning recipe at allrecipes.com, where it received so many rave reviews that she just had to give it a go. The reviews were 100% correct - the cake is moist and rich, almost like a brownie, and it was a breeze to make. You can't taste the chick peas at all and the texture is divine. So try serving it up the next time you have people over and wait until they have finished to tell them what it was made of ;-)

Find the recipe here!

Saturday, April 23, 2011

Pasta Night

I think most families have a quick and easy pasta dish that regularly features on their weekly menu. Pasta always makes a satisfying meal after a long day of work. This pasta dish is one of our regulars. It has all of our favourite flavours - basil, garlic, lemon and chilli - and can be pulled together in under 30 mins. Win! What are some of your favourite ways to do pasta?


We've recently been trying out a gluten-free diet, so this week we prepared this dish with rice penne. We couldn't even taste the difference, so if you're gluten intolerant give this recipe a go!

Chicken Pasta with Rocket and Lemon

250g pasta (penne or fusilli work well)
1 chicken breast, cut in small chunks
2 cloves of garlic, minced
1 lemon, zested and juiced
pinch of dried chilli flakes
2 tablespoons basil pesto
2 cups of fresh baby rocket (arugula)
grated parmesan, to serve
  1. Cook pasta according to the directions on the package.
  2. Meanwhile, fry up the chicken pieces in a little oil over medium-high heat. Cook for approximately 5 minutes, or until browned.
  3. Add the garlic, chilli and lemon zest, and cook for a further 3-4 minutes until the chicken has cooked through.
  4. Drain the pasta, reserve 1/4 cup of the cooking liquid.
  5. Add the pasta and reserved liquid to the frypan with the lemon juice and pesto. Stir to evenly combine.
  6. Season with salt and pepper, and add the rocket. Stir over medium heat until rocket has just started to wilt.
  7. Serve into bowls and sprinkle with parmesan cheese.
Serves 2

Thursday, April 21, 2011

Homemade Peanut Butter Cups

For most of my life I have considered that we have everything we could ask for in Australia - great weather and lifestyle, fresh food and fabulous wines - I could go on. Then I discovered a little something called a Reese's Peanut Butter Cup. Small and unassuming, this little American chocolate and peanut butter delight is a taste sensation and I couldn't understand why we had nothing even remotely similar Down Under. Well, fear not for I found a recipe so we can make mountains of them at home!

Photo courtesy of design sponge
My sister-in-law and I made a batch of these one quiet Saturday evening. They were fun to make and surprisingly easy. When I make them again though, I think I'll use a mini-muffin pan rather than regular size as these little guys are super sweet. To avoid a sugar high they might be better in a smaller dose!

Chocolate-Covered Peanut-Butter Cups
From Design Sponge

3 cups chocolate - milk, semi-sweet or dark
1 cup peanut butter
1/2 cup powdered sugar, sifted
1/4 cup graham crackers, crushed
1 teaspoon sea salt
  1. Line a muffin pan with 12 paper liners. Set aside.
  2. Melt 1 1/2 cups of the chocolate in a double boiler. Alternately, you could do this using a microwave, melting the chocolate in short bursts. Remove the bowl of melted chocolate from the stove and turn off the heat.
  3. Using the back of a spoon or a pastry brush, paint a layer of melted chocolate onto the bottoms and sides of the paper liners. Don’t skimp on chocolate here; coat the liners generously. Set the bowl aside with any remaining melted chocolate left in it.
  4. Put the muffin pan in the refrigerator for 20 minutes while you make the peanut-butter filling.
  5. In a mixing bowl, combine the peanut butter, crushed graham crackers, powdered sugar and salt. Stir with a spoon until well combined.
  6. Return the bowl used to melt the chocolate to the top of the double boiler. Turn the heat to medium-high. Add the remaining 1 1/2 cups of chocolate and melt.
  7. Remove the muffin pan from the fridge. Put a few tablespoons of peanut butter mixture into each paper liner. Tap down each mound with your fingertips to “nest” it into the chocolate bottom.
  8. By now, the chocolate added to the double boiler should all be melted. Using a spoon, dollop the top of each peanut butter mixture mound with a generous portion of chocolate. Use the back of a teaspoon to smooth out the tops.
  9. Place the muffin pan back into the fridge. Within one hour, your cups should be set, depending how cold your fridge runs.
  10. Remove the pan from the fridge. Consume with gusto, or exercise extreme restraint and gift to others!
Makes 12 regular cups

Thanks goes to Design Sponge for filling a void in the lives of millions of Australians.
www.designspongeonline.com/

Chunky Chocolate Cookies

Nothing beats the smell of freshly baked cookies. Whip up a batch of these cookies and you’ll have your friends clamoring for the recipe - which is exactly what I did when my colleague, Kristy, made these divine cookies for a staff morning tea. She generously shared the recipe with me and I can’t wait for you all to try it, too! Happy baking :-)


Chunky Chocolate Cookies

1/2 cup brown sugar
1 egg
1/3 cup oil
2 tablespoons cocoa powder
1/2 cup self-raising flour
1/2 cup plain flour
1/3 cup milk chocolate, cut into small chunks
1/3 cup white chocolate, cut into small chunks
  1. Preheat oven to 180ºC.
  2. Mix sugar, egg and oil with fork.
  3. Add cocoa, flours and chocolate.
  4. Knead lightly with hands to make a soft dough.
  5. Make balls by rolling tablespoons of dough and place on a greased tray, approximately 4cm apart.
  6. Bake for 12 mins. Allow to cool slightly before removing them from the tray - if you can restrain yourself!
Experiment by adding dark chocolate or nuts to add your signature style!

Makes approximately 16 cookies.

Sang Choy Bow WOW!

Don’t let the weird name put you off! This light and healthy meal is ideal for summer and packed full of flavour. The water chestnuts give it a wonderful crunchiness and the sweet hoisin sauce balances the tang of the ginger. It can be made with pork or beef mince, but my favourite is the chicken version.


Chicken Sang Choy Bow

1 iceberg lettuce
2 teaspoons vegetable oil
3 green onions (shallots), finely sliced
2 teaspoons grated fresh ginger
500g chicken mince
2 tablespoons hoisin sauce
1 tablespoon soy sauce
1 teaspoon sesame oil
230g can water chestnuts, drained and finely chopped
1 red chilli, deseeded and finely chopped (or use chilli flakes)
1/2 cup coriander leaves, chopped
  1. Carefully peel eight lettuce leaves, trying not to tear them. Trim them with scissors if necessary to make large cups. Place in a bowl of iced water to make them nice and crisp.
  2. Heat oil in a wok or frying pan on high heat. Stir-fry green onion and ginger for a couple of minutes.
  3. Add chicken mince and cook for about 5 minutes or until browned.
  4. Add hoisin, soy sauce, sesame oil, water chestnuts and chilli, and continue to stir-fry for another 2-3 minutes. Transfer immediately to a serving bowl and stir through the coriander.
  5. Arrange the lettice cups on a platter. Spoon a little chicken mixture into each leaf and serve.

Danielle's Stellar Sticky Date Pudding

Here is a recipe that lives up to all the hype surrounding sticky date puddings. Sweet, rich and gooey, this one is already a favourite of mine and definitely a crowd pleaser. Thanks, Danielle!


Sticky Date Pudding

300g pitted dates
1 1/2 cups water
1 teaspoon bi-carb soda
90g butter
1 cup brown sugar
3 eggs, lightly beaten
1 1/2 cups self-raising flour
1/2 cup Chopped walnuts

Butterscotch sauce:
1 cup brown sugar
300mL cream
185g butter

  1. Pre-heat oven to 180C.
  2. Chop dates into small chunks and place in saucepan with water and bi-carb soda. Stir over medium-hot heat until simmering and fluffy looking. Set aside to cool.
  3. Cream butter and sugar.
  4. Add flour and stir until combined.
  5. Add cooled date mixture to other ingredients and stir until combined. Mix should be slightly runny.
  6. Pour mixture into lightly greased baking dish or muffin trays and sprinkle the top of the pudding/puddings with the chopped walnuts.
  7. Bake in oven until cooked through -should spring back when touched. Approximately 45 mins in a baking dish and 20 mins for muffins.
  8. To make the butterscotch sauce (the best part), first melt the butter over low heat.
  9. Add sugar and stir until well combined and dissolved.
  10. Remove from heat and pour in cream. Beat lightly with whisk to combine.
  11. Return to low-medium heat to warm the sauce through - heating to boiling point may cause the sauce to separate.
To serve, generously drizzle with butterscotch sauce and add a scoop of ice-cream or some fresh whipped cream. Yummo!

Moroccan Delight

My friend, Rachel, is a great cook. If you go over to her house you can guarantee that she will serve up something tasty. Last week I was invited over for dinner and her house was filled with the wonderful aroma of an exotic Moroccan tagine, inspired by the most excellent Jamie Oliver. The flavours were so delicious and the meat so tender that I just had to share the recipe here :-)


Beef Tagine
Taken from Jamie Oliver’s “Jamie Does…”

600g stewing beef
olive oil
1 onion, peeled and finely chopped
small bunch of fresh coriander
400g tin of chickpeas, drained
400g tin of chopped tomatoes
800ml vegetable stock
1 small squash (approximately 800g), deseeded and cut into 5cm chunks
100g prunes, stoned and roughly torn
2 tablespoons flaked almonds, toasted

For the spice rub:
sea salt and freshly ground black pepper
1 level tablespoon ras el hanout spice mix* (Rachel used chilli flakes instead)
1 level tablespoon ground cumin
1 level tablespoon ground cinnamon
1 level tablespoon ground ginger
1 level tablespoon sweet paprika

Mix all the spice rub ingredients together in a small bowl. Put the beef into a large bowl, massage it with the spice rub, then cover with clingfilm and put into the fridge for a couple of hours – ideally overnight. That way the spices really penetrate and flavour the meat.

When you’re ready to cook, heat some olive oil in a tagine or casserole–type pan and fry the meat over a medium heat for 5 minutes. Add your chopped onion and coriander stalks and fry for another 5 minutes. Tip in the chickpeas and tomatoes, then pour in 400ml of stock and stir. Bring to the boil, then put the lid on the pan or cover with foil and reduce to a simmer for 1½ hours.

At this point add your squash, the prunes and the rest of the stock. Give everything a gentle stir, then pop the lid back on the pan and continue cooking for another 1½ hours. Keep an eye on it and add a splash of water if it looks too dry.

Once the time is up, take the lid off and check the consistency. If it seems a bit too runny, simmer for 5 to 10 minutes more with the lid off. The beef should be really tender and flaking apart now, so have a taste and season with a pinch or two of salt. Scatter the coriander leaves over the tagine along with the toasted almonds, then take it straight to the table with a big bowl of lightly seasoned couscous and dive in.

* I was intrigued by the ras el hanout spice mix that this recipe calls for, which is an exotic Moroccan spice blend. After some Googling I discovered that you can make your own and store the mix in an airtight container for up to 2 months.

Ras el Hanout Spice Mix

1 teaspoon ground cumin
1 teaspoon ground ginger
I teaspoon turmeic
1 teaspoon salt
3/4 teaspoon ground cinnamon
3/4 teaspoon freshly ground black pepper
1/2 teaspoon ground white pepper
1/2 teaspoon ground coriander seeds
1/2 teaspoon cayenne
1/2 teaspoon ground allspice
1/2 teaspoon ground nutmeg

Flourless Orange Cake

If you think a cake can’t be delicious without flour, you’re wrong. This cake, made with almondmeal, is incredibly moist and you’ll find yourself reaching for seconds. It's fairly time consuming to prepare, but I think it's worth the effort.


Flourless Orange Cake

2 whole oranges with peel
3 eggs
1 1/4 cups white sugar
3/4 teaspoon baking powder
2 cups almond meal

For the syrup:
1 whole orange
3/4 cup white sugar

  1. Place the oranges in a large saucepan, and add enough water to cover. Bring to a boil, and boil for 1-2 hours over medium heat. Check occasionally to make sure they do not boil dry. Allow the oranges to cool, then cut them open and remove the seeds. Process in a blender or food processor to a coarse pulp.
  2. Preheat the oven to 170C. Grease and flour a 22cm springform cake tin.
  3. In a large bowl, whip eggs and sugar together using an electric mixer until thick and pale (5-10 minutes). Mix in baking powder. Stir in the pureed oranges. Gently fold in almond meal, then pour batter into the prepared pan.
  4. Bake on top shelf of oven for 55-60 minutes, or until a skewer inserted into the center comes out clean. (Tip: It’s really important to put it on the top shelf. I mistakenly put it on the bottom shelf the second time I made this and it was almost burnt on top!) Set aside to cool in the pan for 15 minutes.
  5. To make the syrup, use a zester to remove the rind from the orange. Juice orange.
  6. Place rind in a saucepan of boiling water and cook for 5 minutes or until soft. Drain. Return to pan with orange juice and sugar. Place over low heat and cook, stirring, for 2-3 minutes or until the sugar dissolves and the syrup thickens.
  7. Turn cake onto a serving plate. Use a skewer to gently prick the top. Spoon over syrup. Cut into wedges and serve with double cream.

Wednesday, April 20, 2011

You had me at haloumi...

Let’s be honest - lentils are just about the most drab sounding food out there. However, with a bunch of fresh ingredients and the wonder of haloumi, you have yourself one seriously tasty dish. If you don’t believe me, try it for yourself - I dare you.

I whipped this dish up tonight in no time with my sister, Bel, and buddy, Bec, and we concluded that it will be a definite favourite this summer.


Haloumi & Lentil Salad

1 tin brown lentils, drained, rinsed
1/2 red onion, thinly sliced
1 Lebanese cucumber, halved, sliced
2-3 tomatoes, chopped
1/2 cup mint leaves, shredded
1/2 tin of corn kernels, drained, rinsed
couple of handfuls of fresh baby rocket (arugula)
juice of half a lemon
1 tablespoon extra virgin olive oil
250g block haloumi cheese
2 tablespoons vegetable oil

  1. Combine lentils, onion, cucumber, tomatoes, mint, corn, rocket, lemon juice and oil in a bowl. Season with fresh cracked pepper then toss to combine.
  2. Cut haloumi lengthways (about 4mm thick).
  3. Heat oil in a non-stick frying pan over medium heat. Cook haloumi for 2 minutes each side, or until golden.
  4. Serve lentil salad topped with warm haloumi. Sprinkle with a little balsamic vinegar for extra zing, if desired.

Mousse au Chocolat


Who doesn’t love chocolate mousse? It’s light and fluffy and, best of all, it’s so delightfully chocolatey! This is a traditional French recipe, which only calls for three ingredients - chocolate, sugar and eggs. Easy!

Mousse au Chocolat

125g dark chocolate
6 eggs, separated
6 tablespoons caster sugar

1. Break up the chocolate and melt over low-heat in a bowl over a saucepan of simmering water.Set aside to cool for a bit.
2. In a clean metal bowl, use an electric beater to whisk the egg whites until stiff peaks form.
3. In a separate bowl, lightly mix together the egg yolks, sugar and melted chocolate.
4. With a clean metal spoon, gently fold the egg whites into the chocolate mixture.
5. Spoon the mixture into small bowls and cover with some clingfilm.
6. Leave to set in the fridge for at least 24 hours.
7. Serve with raspberries and shavings of dark chocolate if you wish.

Patatas Bravas


And now for another recipe from our tapas evening last week. Apparently Patatas Bravas (Crisp Spiced Potatoes) is a classic tapa that can be found all over Spain. It was really easy to make and the sauce was particularly well received.

Patatas Bravas

3 tablespoons olive oil
4 large potatoes, peeled, and cut to 1-inch cubes
2 tablespoons onion, very finely chopped
2 cloves garlic, minced
Salt and freshly ground black pepper
1 1/2 tablespoons smoked paprika
1/4 teaspoon Tabasco Sauce
1 teaspoon ground thyme
1/2 cup tomato sauce (ketchup)
1/2 cup mayonnaise
1-2 tablespoons lemon juice
Chopped parsley, to garnish
1 cup canola oil , for frying

  1. To make the brava sauce, heat the olive oil in a frying pan over medium heat. Add the onion and garlic and sauté until the onion is soft.
  2. Turn off the heat, and add the paprika, Tabasco sauce, and thyme, stirring well.
  3. Transfer to a bowl and add the ketchup and mayonnaise. Add lemon juice and mix to combine. Season with salt and pepper to taste. Set aside.
  4. Parboil the potatoes either on the stovetop or in the microwave.
  5. Sprinkle the potatoes lightly with salt and black pepper. In a saucepan, deep fry the potatoes in the canola oil until cooked through and golden-brown, stirring occasionally. (Take care when adding the potatoes to the saucepan because the oil will splatter due to the salt.)
  6. Drain the potatoes on paper towels, check the seasoning, add more salt if necessary.
  7. Garnish with parsley and serve the crispy potatoes side-by-side with the sauce for dipping. Traditionally, the sauce is mixed through the potatoes immediately before serving, although I was afraid they would become soggy too quickly.

Tapas Fun

Phil and I had friends over for dinner last night and I decided it would be fun to cook some Spanish tapas. I first fell in love with tapas while I was living in Shanghai. There is a fabulous restaurant there called Azul offering a tantalising range of the tasty Spanish snacks. If you are ever in the neighbourhood, checking it out really is a must.

Tapas certainly does require a lot more prep and planning than a normal meal, but when only done occasionally the novelty makes the effort worthwhile. The first task was to narrow down a selection of tapas - there are so many to choose from! I decided not to be too strictly Spanish, but keep the flavours Mediterranean. Here was my menu:

  - Roasted Cherry Tomato & Parmesan Dip with crusty bread
  - Platter of salami, marinated olives and fresh veges
  - Grilled Haloumi
  - Garlic Chorizo and Prawns
  - Patatas Bravas
  - Lamb meatballs with mint yoghurt sauce (that one was more Greek-style)
  - Fried Cauliflower
  - Sangria

The Roasted Cherry Tomato and Parmesan Dip was dead easy to make and was so lovely with the crusty bread.


Roasted Cherry Tomato & Parmesan Dip
Adapted from AWW: Tapas

200g cherry tomatoes
olive oil
1/2 cup light sour cream
1/2 cup finely grated parmesan cheese (Avoid pre-grated. Fresh is best!)
2 tablespoons finely chopped fresh basil
1/2 teaspoon dried chilli flakes

  1. Preheat oven to 200C.
  2. Place tomatoes on an oven tray and drizzle with olive oil. Roll the tomatoes around to coat in oil. Roast, uncovered, for about 15 minutes or until the tomato skins split. Allow to cool.
  3. Combine tomatoes with the other ingredients. I like to squash the tomatoes a bit to break them into smaller chunks and to release some of the flavour into the dip.
  4. Serve with crusty bread (like a vienna loaf), lighty toasted and rubbed with garlic.

I will post a couple of the other tapas recipes over the next few days. Stay tuned!